Auricular Reconstruction of a Child’s Ear: Phase 2
Your child’s outer ear (auricle) is missing or underdeveloped (called microtia). Surgery can be done to build your child an outer ear. The surgery is done over several phases. The exact details of each surgery and the number of surgeries needed depend on the surgeon, and on the structures present in your child’s ear. The basic goal of phase 2 is to move the earlobe into the correct position and to raise the cartilage framework from the pocket in which it had been buried in phase 1. These steps may be combined into one procedure. Or they may be done separately. Read on to learn more about this surgery and what to expect. Often, microtia happens with varying degrees of hearing loss. Your child's hearing loss may be corrected at a later time through different treatments.
A multistep process
Auricular reconstruction is done during 3 or more surgeries. Phase 2 is often done about 3 to 6 months after phase 1 is completed. This gives the child time to heal from the first procedure. Another 1 to 3 procedures are then needed to make a new outer ear. Your surgeon can tell you more.
Preparing for phase 2 surgery
In an age-appropriate manner, explain the surgery to your child. Prepare your child for the surgery as you have been told. Tell the surgeon about all medicines your child takes. This includes over-the-counter and prescription medicines. It also includes herbs and other supplements. Your child may need to stop taking some or all of them before surgery. Also follow any directions your child is given for not eating or drinking before surgery.
The day of surgery
The phase 2 surgery takes about 2 to 3 hours. Your child may need to stay in the hospital afterward. Or they may go home the same day. Before the surgery begins:
-
To keep your child from feeling pain during the procedure, they are given general anesthesia. This puts your child in a state like deep sleep through the procedure.
-
When your child is asleep, an IV line is put into a vein in your child’s arm or hand. This line delivers fluids and medicines. A tube is then passed through your child’s mouth into the trachea (windpipe) to help with breathing during surgery. Special equipment keeps track of your child’s heart rate, blood pressure, and oxygen levels.
During the procedure
-
First, the earlobe is moved. Incisions (cuts) are made in the skin over the cartilage. Flaps of skin are created. These are pulled together to move the earlobe into the correct position. Any excess skin is removed. The incisions are then closed with stitches (sutures).
-
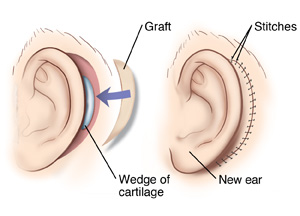
Then, the ear is lifted. A curved incision is made behind the ear. A wedge of the child’s cartilage is then placed below the cartilage framework. This lifts the new ear slightly off the head. The wedge is covered with a flap of tissue. This tissue flap is taken from the back of the normal ear or from the scalp. Then a skin graft is used to line the back of the ear. The skin graft is taken from the groin area, hip, buttocks, or upper arm. A special dressing is placed behind the ear to hold the skin graft in place as it heals.
-
One or more tubes (drains) may be placed near incisions. This drains any fluid that builds up in the area after surgery.
Recovering in the hospital
When the surgery is complete, your child will be taken to a room to wake up from the anesthesia. You may be able to see your child at this time. Your child will be watched as they rest. Pain medicine can be given if needed. If your child needs to stay overnight, you and your child will then be taken to a hospital room. You will be told when you can take your child home.
Recovering at home
Once home, follow any directions you are given for caring for your child. During your child’s recovery:
-
Give prescribed medicine as directed. Even if your child doesn’t complain of pain, give the medicine on time. Don't wait for the pain to get bad. (This makes the pain harder to control.)
-
Do your best to prevent your child from touching the ear. Don’t allow siblings or other children to touch your child’s ear or play roughly around your child as they heal.
-
If your child is sent home with a drain in an incision, follow the directions you are given for how to care for it.
When to call the healthcare provider
Be sure you have a contact number for your child’s surgeon. After you get home, call if your child has any of the following:
-
Fever of 100.4° F ( 38° C) or higher, or as directed by your surgeon
-
Bleeding or a large amount of drainage from an incision
-
Symptoms of infection at an incision site, such as increased redness or swelling, warmth, pain that gets worse, or foul-smelling drainage
-
Any injury to the ear
Follow-up
Take your child for scheduled follow-up visits. If appropriate for your child's age, encourage -them to write down questions or concerns about the procedure. Make time during the visit for your child's questions or concerns to be discussed. During these visits, the surgeon will check to make sure the ear is healing correctly. At this time, you and the surgeon can schedule any more surgeries needed to repair the ear.
Risks and complications
All procedures have risks. The risks of this procedure include:
-
Bleeding
-
Infection
-
Risks of anesthesia. You will discuss these with the anesthesiologist.
-
Dislike of how the ear looks after surgery
-
Cartilage wearing through the skin (extrusion)